Natural Scene Designer's
Shaded Relief Control Panel
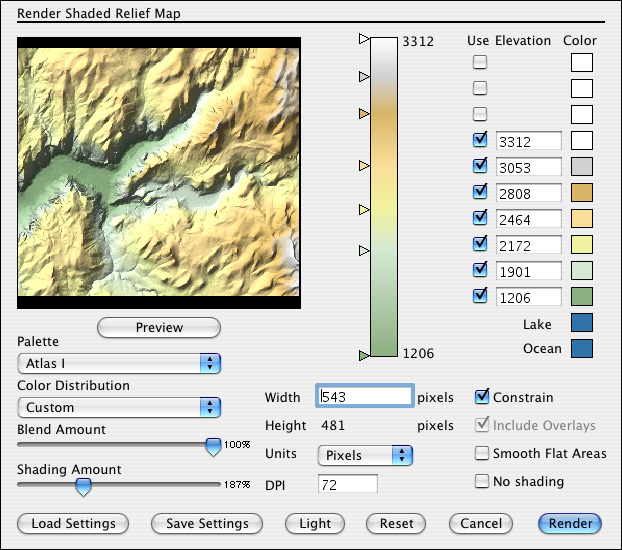
Many settings are adjustable to create a wide range of shaded relief maps.
The "Preview" button lets you instantly view your changes. When
the settings are set as desired, you can click "Render" to make
a Shaded Relief map at any size and resolution. You can adjust the altitude
range for each color.You can control the amount of blending between color
transitions. This elevation based blending can be sudden (at 0% blending)
or gradual. The preview will show the resulting shaded relief map.
Several preset color palettes are available via a dropdown menu. You have a choice of Default, Atlas I, II, III, and IV, Green, Brown, Gray, and White. Or you can create your own custom palette and save it in a file. If you click on a color square you can adjust the color.
The Color Distribution menu offers several schemes for setting the color elevations. There are six distribution methods.
Equal Relative - Spaces colors at equal intervals. Colors are set between the lowest and highest elevations in the terrain.
Equal Absolute - Spaces colors at equal intervals. Colors are set every 500 meters starting at 0 (sea level).
Arithmetic Relative - Spaces colors at increasing intervals according to an arithmetic progression. Colors are set between the lowest and highest elevations in the terrain.
Arithmetic Absolute - Spaces colors at increasing intervals according to an arithmetic progression. Sets colors starting at 0.
Geometric Relative - Spaces colors at increasing intervals according to a geometic progression.
Geometric Absolute - Spaces colors at increasing intervals according to a geometic progression. Sets colors starting at 0.
The Shading Amount slider controls the shading contrast. A value of 100% is the default setting. Flat areas might look better with values above 100% to help bring out the terrain’s features.
You might wonder why there is a check box for “No Shading”. This can be used to create a color map for use as a terrain overlay. You can edit the color map in a painting program, add roads, names, etc. and then import it back into Natural Scene Designer as a terrain overlay.
When you save the shaded relief
map, you will have an option to create a “TFW” file which contains
alignment information necessary for automatically matching it to a DEM.
The width and height of the final rendered map are adjustable. Select
“Constrain Proportions” to maintain the aspect ratio. You can
also select whether or not to include terrain overlays in the shaded relief.
Use the “Preview” button to fine tune your settings. If you
wish to retain the settings for use with other terrains, use the “Save
Settings” button. Then you can reload the same settings later as
needed.